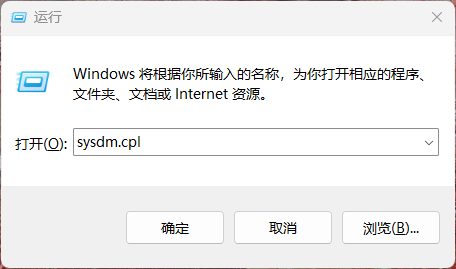
- 按
Win + R,并输入sysdm.cpl。
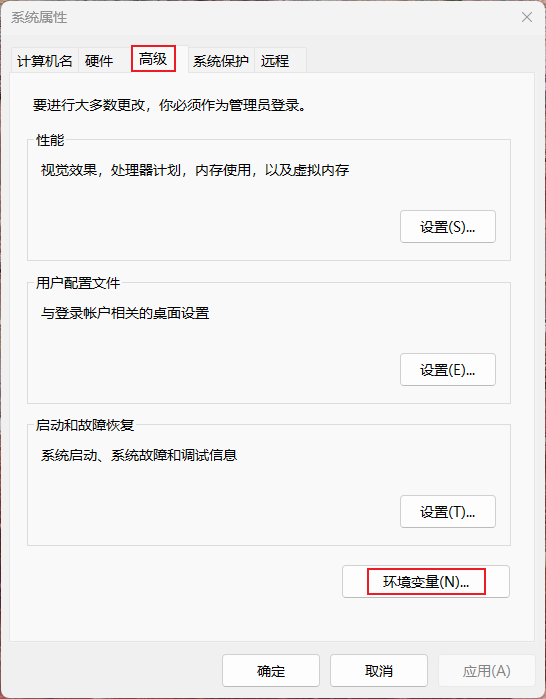
- 选择
高级,然后点击环境变量。
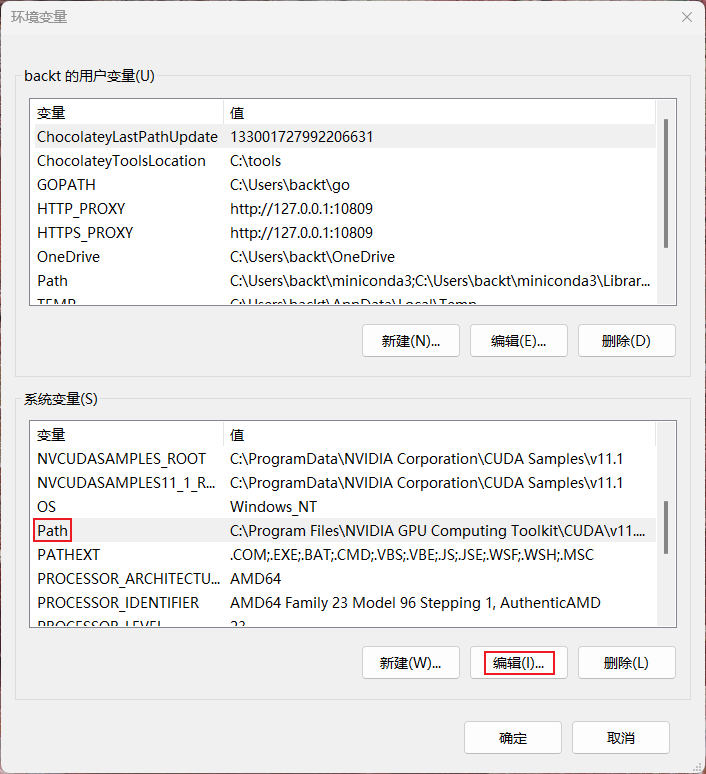
- 在系统变量区中选择
Path,点击编辑。
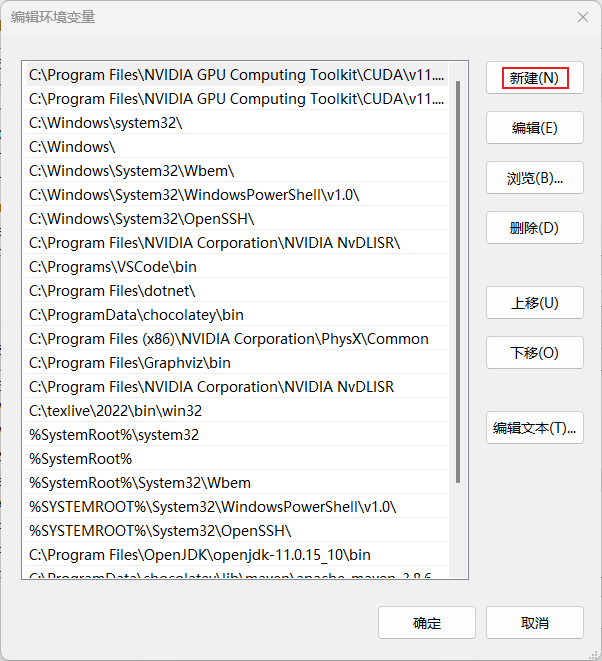
- 点击
新建,输入程序的执行路径(绝对路径)。
若未关闭当前CMD。输入echo %PATH%会显示原来的 PATH 值。
若已关闭当前CMD。每个正在运行的 Windows 程序都会有自己已加载的 PATH,可以使用Process Explorer来查看当前正在运行的程序的环境变量。例如:如果你之前打开了 Chrome,且一直未关闭,按Ctrl+O打开C:\Windows\System32\cmd.exe,然后输入echo %PATH%会显示原来的 PATH 值。恢复之后删除C:\Program Files\Google\Chrome\Application和用户变量中的PATH值即可。
若已重启电脑。手动恢复 PATH 到默认值%SystemRoot%\system32;%SystemRoot%;%SystemRoot%\System32\Wbem;%SYSTEMROOT%\System32\WindowsPowerShell\v1.0,其他值已丢失。
参考:如何恢复我删除的Path环境变量?
Visual Studio Code 官网
- 安装编译器
- Windows(二选一)
- Linux:
sudo apt install gcc g++ gdb build-essential - Mac OS:
xcode-select --install
- 安装 VS Code C/C++ 扩展
ms-vscode.cpptools。 - asd
- 解决头文件找不到
- 修改
c_cpp_properties.json - Linux:
gcc -v -E -x c++ -
Windows 10 + Visual Studio 2019
 1
 2
 3
 4
 5
 6
 7
 8
 9
10
11
12
13
14
15
16
17
18
19
20
21
| {
"configurations": [
{
"name": "Win32",
"includePath": [
"${workspaceFolder}/**",
"C:/Program Files (x86)/Microsoft Visual Studio/2019/Community/VC/Tools/MSVC/14.29.30037/include/**"
],
"defines": [
"_DEBUG",
"UNICODE",
"_UNICODE"
],
"compilerPath": "C:/Program Files (x86)/Microsoft Visual Studio/2019/Community/VC/Tools/MSVC/14.29.30037/bin/Hostx64/x64/cl.exe",
"cStandard": "c17",
"cppStandard": "c++17",
"intelliSenseMode": "windows-msvc-x64"
}
],
"version": 4
}
|
Windows 10 + Mingw-w64
 1
 2
 3
 4
 5
 6
 7
 8
 9
10
11
12
13
14
15
16
17
18
19
20
21
22
| {
"configurations": [
{
"name": "Win32",
"includePath": [
"${workspaceFolder}/**",
"C:/Portable/mingw64/lib/gcc/x86_64-w64-mingw32/8.1.0/include/**",
"C:/Portable/mingw64/lib/gcc/x86_64-w64-mingw32/8.1.0/include/c++/**"
],
"defines": [
"_DEBUG",
"UNICODE",
"_UNICODE"
],
"compilerPath": "C:/Portable/mingw64/bin/g++.exe",
"cStandard": "c17",
"cppStandard": "c++17",
"intelliSenseMode": "gcc-x64"
}
],
"version": 4
}
|
- 打开设置。
C_Cpp: Clang_format_fallback Style设为{BasedOnStyle: LLVM, UseTab: Never, IndentWidth: 4, TabWidth: 4}C_Cpp › Default: Cpp Standard设为``C_Cpp › Default: C Standard设为``
参考
关闭 Windows Defender “首次看到时阻止”:
问题描述:
编译运行程序的时候总是弹出一个 Microsoft Defender 防病毒程序窗口,提示“需要扫描当前程序”。
解决方法:
- 按
Win+R,输入gpedit.msc,打开本地组策略编辑器。 - 左侧选择
计算机配置->管理模板->Windows 组件-Microsoft Defender 防病毒->MAPS。 - 右侧双击
配置“首次看到时阻止”功能,选择已禁用,然后点击确定,保存退出。
.vscode/c_cpp_properties.json
 1
 2
 3
 4
 5
 6
 7
 8
 9
10
11
12
13
14
15
16
| {
"configurations": [
{
"name": "Linux",
"includePath": [
"${workspaceFolder}/**"
],
"defines": [],
"compilerPath": "/usr/bin/g++",
"cStandard": "c11",
"cppStandard": "c++11",
"intelliSenseMode": "linux-gcc-x64"
}
],
"version": 4
}
|
 1
 2
 3
 4
 5
 6
 7
 8
 9
10
11
12
13
14
15
16
17
18
19
20
21
22
23
24
25
26
27
28
29
30
| {
// See https://go.microsoft.com/fwlink/?LinkId=733558
// for the documentation about the tasks.json format
"version": "2.0.0",
"tasks": [
{
"label": "C/C++: g++ build active file",
"type": "shell",
"command": "/usr/bin/g++",
"args": [
"-g",
"-std=c++11",
"${file}",
"-o",
"${fileDirname}/${fileBasenameNoExtension}"
],
"options": {
"cwd": "/usr/bin"
},
"problemMatcher": [
"$gcc"
],
"group": {
"kind": "build",
"isDefault": true
},
"detail": "Task generated by Debugger."
}
]
}
|
 1
 2
 3
 4
 5
 6
 7
 8
 9
10
11
12
13
14
15
16
17
18
19
20
21
22
23
24
25
26
27
28
29
| {
// Use IntelliSense to learn about possible attributes.
// Hover to view descriptions of existing attributes.
// For more information, visit: https://go.microsoft.com/fwlink/?linkid=830387
"version": "0.2.0",
"configurations": [
{
"name": "C/C++: g++ build and debug active file",
"type": "cppdbg",
"request": "launch",
"program": "${fileDirname}/${fileBasenameNoExtension}",
"args": [],
"stopAtEntry": false,
"cwd": "${workspaceFolder}",
"environment": [],
"externalConsole": false,
"MIMode": "gdb",
"miDebuggerPath": "/usr/bin/gdb",
"setupCommands": [
{
"description": "Enable pretty-printing for gdb",
"text": "-enable-pretty-printing",
"ignoreFailures": true
}
],
"preLaunchTask": "C/C++: g++ build active file"
}
]
}
|
- Python官网
- Miniconda官网
- Anaconda官网
- Windows:
%APPDATA%\pip\pip.ini
1
2
| [global]
proxy = http://user:password@proxy_name:port
|
更新:conda update
查看环境:conda env list或conda info -e
创建环境:conda create -n <ENVNAME> python=3.X -y
删除环境:conda remove -n <ENVNAME> --all -y
设置代理:conda config --set proxy_servers.http http://127.0.0.1:10809
PyTorch 官网
CPU:
Anaconda:
conda install pytorch torchvision torchaudio cpuonly -c pytorch
Pip:
pip install torch==1.8.1+cpu torchvision==0.9.1+cpu torchaudio===0.8.1 -f https://download.pytorch.org/whl/torch_stable.html
GPU (CUDA 11.0):
Anaconda:
conda install pytorch torchvision torchaudio cudatoolkit=11.0 -c pytorch
Pip:
pip install torch==1.7.1+cu110 torchvision==0.8.2+cu110 torchaudio===0.7.2 -f https://download.pytorch.org/whl/torch_stable.html
检查是否安装成功:
1
2
3
4
5
| import torch
# 检查 pytorch 是否安装成功
print(torch.__version__)
# 检查 CUDA 是否可用
print(torch.cuda.is_available())
|
TensorFlow 官网
Pip:
CPU and GPU: pip install tensorflow
Wheel:
1
2
3
4
| # https://storage.googleapis.com/tensorflow/windows/cpu/tensorflow_cpu-2.4.0-cp38-cp38-win_amd64.whl
pip install tensorflow_cpu-2.4.1-cp38-cp38-win_amd64.whl # CPU
# https://storage.googleapis.com/tensorflow/windows/gpu/tensorflow_gpu-2.4.0-cp38-cp38-win_amd64.whl
pip install tensorflow_gpu-2.4.0-cp38-cp38-win_amd64.whl # GPU
|
检查是否安装成功:
1
2
3
4
5
6
| import tensorflow as tf
# 检查 tensorflow 是否安装成功
print(tf.__version__)
# 检查 CUDA 是否可用
# 输出最后一行显示 [PhysicalDevice(name='/physical_device:GPU:0', device_type='GPU')]
print(tf.config.experimental.list_physical_devices('GPU'))
|
问题描述:
安装 CUDA 11.1 + cuDNN 8.1,tensorflow 2.4.1 检查 GPU 时报错:
Could not load dynamic library 'cusolver64_10.dll'; dlerror: cusolver64_10.dll not found
解决方案:
卸载重新安装 CUDA 11.0 + cuDNN 8.0,参考 Windows 经过测试的构建配置。
- NVIDIA 驱动程序下载,选择对应版本,下载安装。

- CUDA 工具包下载,下载对应版本安装。

在CMD输入nvcc -V,出现如下输出表示安装成功。
1
2
3
4
5
| nvcc: NVIDIA (R) Cuda compiler driver
Copyright (c) 2005-2020 NVIDIA Corporation
Built on Tue_Sep_15_19:12:04_Pacific_Daylight_Time_2020
Cuda compilation tools, release 11.1, V11.1.74
Build cuda_11.1.relgpu_drvr455TC455_06.29069683_0
|
- cuDNN 下载,需要登陆账号,登陆后下载对应版本,解压将
bin、include和lib三个文件夹的内容复制到 CUDA 安装目录下。


